Project
- The Cradle
- The Toy Box
- Step Stool
- Dining Room Table
- Splatter Art
- The Treehouse
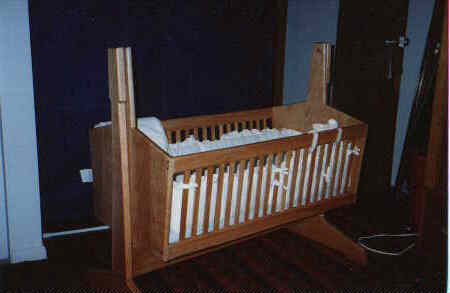
Here's the cradle as of July 1997: Completed at last!
This whole thing started when Rick and I bought plans for a Morris Chair that we saw in American Woodworker magazine. Debbie suggested that instead of the chair, a more practical project would be a cradle for the baby. I searched the Internet for cradle plans and found a web site of someone who had built one, and the design looked nice, so I bought the plans.
So far it seems to be turning into a typical Steve Shoyer project, where it ends up costing about three times the retail price of the item, and I wind up with a bunch of expensive tools that I won't use again. But it's fun, I get a feeling of accomplishment, and I wind up with a bunch of expensive tools!
As you read the progress report, remember that a new cradle costs about $200-$300 or so. Assembled.
The plans arrived in late February; here's a running diary of progress:
- Feb 28, 1997: First trip to the lumber yard (Anderson & McQuaid). Very confusing. I
- Mar 1, 1997: Second trip to the lumber yard, and I pick up 5 pieces of cherry. Costs $141, but it looks like nice wood, and it fits in the car (after some trimming).
- Mar 2, 1997: Rick and I go to the shop. I started out by cutting the boards down to the sizes on the plans, and started preparing the cradle ends. Tools used so far: radial arm saw, jointer.
- Mar 6, 1997: Debbie and I are shopping for baby furniture, so I figure that I'll pick up the pad for the cradle. I learn that the cradle I'm building is a little smaller (17" x 31") than a standard sized cradle (18" x 36"), so we won't be able to get sheets or a bumper for it. One salesperson tries to cheer me up by suggesting that if the baby is a girl, she can use the cradle for her dolls. Just what I wanted to hear. The wood has already been cut for 31" sides.
- Mar 10, 1997, 7:30 AM: Third trip to the lumber yard. Another piece of cherry. Another $21.
- Mar 10, 1997, 7:30 PM: Rick and I are back at the shop. I re-cut the sides to 36" with the new board, and cut down the 31" boards to 25 3/4" for the end panels to replace some wood that had an interesting grain pattern but wasn't too straight. The end panels are joined, glued, and clamped. I remember something from high school about not wiping the excess glue from the wood (which ruins the finish) and instead waiting for the glue to dry and then simply scraping it off cleanly, which I'll do tomorrow night. New tools used: biscuit joiner (just like Norm Abram!).
- Mar 11, 1997: It seems that things have changed since high school. The glue is rock hard and impossible to scrape. I spend the night trying to scrape, sand, and dissolve the glue, making little progress (unless you count frustration as progress). New tools used: scraper, orbital sander, belt sander, Dremel (multiple bits!), water, razor blades.
- Mar 15, 1997: After spending too much time with the orbital sander, I come up with a better idea. Using the "Don't force it, just use a bigger hammer" theory, I take the end panels to a lumber yard (first trip to the second lumber yard, Guthrie Lumber) and have them run through a 24"-wide planer. Five minutes later, the panels are smooth and look great, my ego is repaired, and my enthusiasm is back! Custom millwork: $10 (minimum), but well worth it.
- Mar 17, 1997: I thought that I'd draw out the final shape of the end panels so I can trim them tomorrow, but when I try to lay out the dimensions, they don't add up. The dimensions for the height of the panels adds up to 26", but I had already cut the board to 25 3/4" as specified elsewhere in the plans. A few other dimensions don't add up, so rather than continue to follow the step-by-step instructions (by the way, I'm at step 3 so far), I decide to work on the sides and figure out how the ends will be cut later. Right now I'm not very happy with the plans.
- Mar 18, 1997: After a quick stop at Home Depot ($8 for some birch plywood that I will probably scrap), we're back in the shop. I rip the side rails in half and run them on the jointer to get them to the right dimensions, and then I start to cut the 1/4" wide side slats. Most of them come out about 1/4" wide, or at least pretty close. The next step requires a couple of roundover bits for the router, and either a dado blade or another router bit to make some slots in the side rails. Good bits/blades will cost me about $80; cheap ones will be less than $20. No decision yet. New tools used: band saw, table saw.
- Mar 24, 1997: I decided to go with decent router bits via mailorder. The two roundover bits only cost $28. Haven't decided how to do the dado yet.
- Apr 5, 1997: After a long day of running around, we decided that progress would be faster if I had some tools at home to work with. We pick up a router ($220) and a palm sander ($40), along with a couple of clamps ($16).
- Apr 6, 1997: What's a router without a router table? We pick up a router table ($150) and a straight bit ($6) to cut the dado (but at least we're saving big bucks on not getting a dado blade!).
- Apr 8, 1997: I finally got the right metric screws to attach the router to the table, and I've started practicing with the roundover bits. Pretty cool so far, although I'm running out of scrap wood.
- Apr 12, 1997: Started to sand the slats for the sides of the cradle. They're taking a while, but they come out pretty smooth, and I don't feel like buying a belt sander (well, ...). Also stopped at Home Depot for a few more clamps ($50, but you can never have too many clamps) and assorted stuff.
- Apr 13, 1997: We were headed to the mall, so we stopped at the Woodworker's Warehouse and got a featherboard for the router table, a sanding pad, and more clamps ($18). At home, more slat sanding.
- Apr 17, 1997: Rick helped me move some furniture and then it was off to the shop. I had finished sanding the slats, so I spent the entire time cutting the 1" spacers on the band saw. Now I've got all the pieces to put the sides of the cradle together, but I can do that at home.
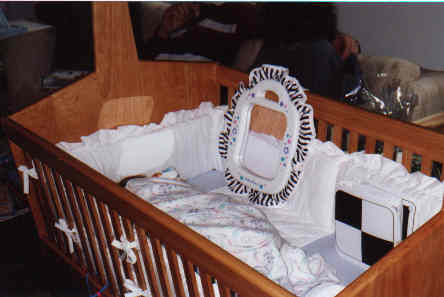
- Apr 23, 1997: I was at the baby furniture store paying for the rest of the stuff we're getting for the baby's room, so I got the cradle mattress ($21). It was nice to be able to pick up the standard sized one.
- Apr 27, 1997: Used the router to round the edges of the side rails. I still need to figure out how to cut the grooves at an angle.
- May 3, 1997: I finally cut the grooves. Took about two hours to figure out how to do the angles, and while the solution wasn't pretty (let's just say that there was a lot of duct tape holding the jig together), the results look good.
- May 7, 1997: Glued the first side piece. It's starting to look more like a cradle and less like a bunch of wood on the floor.
- May 8, 1997: Went to the shop but didn't get too much done.
- May 9, 1997: Glued the other side piece.
- May 14, 1997: Finally started cutting down the end pieces to their correct shape. I made a mistake on the first end and cut it a bit too short, so I'll have to sand down the side pieces to fit. I was extremely upset when I realized my error, but I guess that's the way it goes.
- May 15, 1997: Didn't work on the cradle, but spent a lot of time at the hospital with Debbie. Guess I better finish this thing sooner than planned. The baby is now due three weeks earlier than originally planned.
- May 19, 1997: Worked on sanding down the sides so I can assemble the basket (at least) before the baby arrives. I thought I'd have another month. The stand shouldn't take too long once the basket is done (sure!).
- May 22, 1997: Another Home Depot run. I got a plane (decent, not the $170 one I used at the shop), a couple of brad point bits, a forstner bit (expensive, especially as I only need it for two holes), and a drill guide that turns a handheld drill into a not-too-accurate drill press (not perfect, but it should help). Another $100.
- May 24, 1997: Got a lot done today. I borrowed the biscuit joiner from the shop and a couple of clamps, so I joined the two end pieces for the stand and left them to dry while I worked on the basket. I was hoping to get the basket glued tonight, but I found that the screws that I ran around to find (#6 x 1") are too long. Another trip to Home Depot tomorrow to exchange them and I should be in business.
- May 25, 1997: Picked up the screws I wanted, along with a flush cut saw ($15) for cutting off the ends of the dowels. Rounded the edges of the end pieces with the router, and used the new plane to cut down the basket side to fit the end that was a little too short. Also fastened the cleats onto the sides.
- May 26, 1997: Glued the basket together - it looks pretty good. The walnut dowels should come out nice.
- May 26, 1997 (later in the day): Started applying the finish, which is Tung oil. It really brings out the grain of the cherry.
- May 27, 1997: Did another coat of Tung oil. The basket looks really good. I'm pretty happy with it.
- May 29, 1997: Worked on the stand pieces. I used the Dremel to sand the rounded edges of the sides, and started to plane/sand the straight edges.
- May 30, 1997: Had the baby, and she and her Mom are great. Didn't work on the cradle today.
- June 6, 1997: Started sanding the edges of the stand, but the family started arriving. On hold again.
- June 13, 1997: Finished sanding the stand pieces. Drilled the holes for the bearings and rounded the edges with the router. Glued the pieces together, clamped it, and sit for a while. The dowel holes on one side were a bit ragged, so after trimming the dowels (that flush cut saw works very well) I used a bit of filler putty. Hopefully it won't be too noticeable; it's supposed to match Cherry, but who knows.
- June 14, 1997: Sanded the stand and started the first coat of Tung oil.
- June 15, 1997: Put on a second coat of oil, and started cleaning up. There was a lot of sawdust over everything. Put the router back in its box.
- June 16, 1997: Attached the basket to the stand. Done. Looks pretty good. Can't wait to start on the Morris chair.
Total cost: $844 (or a little more, as I didn't count everything); New tools: Router and router table, palm sander, assorted router and drill bits, clamps, drill guide, flush cut saw.
Epilogue (no, this is not a Quinn Martin production): As I suspected, it was a typical Steve Shoyer project. I guess I should have a section for tools I didn't buy (table saw, band saw, and belt sander spring to mind), but the list would be too long. I was pretty happy with the way the cradle turned out, especially as I haven't used a lot of these tools before, and hadn't really done any woodworking in about ten years (not counting assembling things from Ikea). I've got a lot more respect for real woodworkers, and hope that the next project is not another ten years away.
If you're thinking about building this cradle, a few words of advice:
- Check the dimensions carefully, because I ran into a few problems with the sizes of the parts (Cleats, part H, were listed as being 4 1/4" wide, when they're really 3/8")
- Layout the pieces on paper before cutting the wood. The dimensions on the end panel layout add up to 10 15/16" to the centerline if you add one way, and 10 7/8" if you add another way. If you make full-sized templates you can be sure it'll work before cutting.
- Think about making it a standard 18" x 36" and modify the dimensions before buying the wood. If you don't want to make the change, at least it was an informed decision.